Excel To Tally ERP 9, Excel to Tally Import, Excel to Tally, udiMagic Excel to Tally

Uncategorized

Mismatch due to tax amount modified in voucher

Problem
Vouchers not included in GSTR reports even though the tax amount difference is of 1 paise.
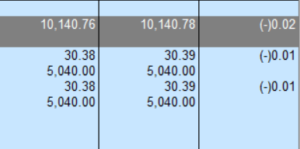
Tally GSTR reports | Mismatch due to tax amount modified in voucher
Tally GSTR Reports | Mismatch due to tax amount modified in voucher

Steps to resolve “mismatch due to tax amount modified in voucher” where tax difference is 1 paise

  1. Start Tally and open your Company
  2. Select option “Display | Statutory Reports | GST | GSTR 3B”
  3. Click F12: Configuration and set the value for “Allow tax difference up to” as 1
  4. Next, set the value for “Actual tax versus computed tax” as Greater or lesser

The above will resolve the errors relating to “mismatch due to tax amount modified in vouchers” wherein the tax amount difference was in 1 or 2 paise.

Additional references:
https://shwetasoftwares.freshdesk.com/support/solutions/articles/19000065136-mismatch-due-to-tax-amount-modified-in-voucher

Free Tally tools

Extract Tally ERP 9 data to Microsoft Excel

  1. Start Tally ERP 9 and open your Company
  2. Start udiMagic FREE Edition v2.0
  3. Select option “Tally to Excel”
  4. Next, type the “SQL Statement” (see samples)
  5. Click the Start button
  6. Click the “View in Excel” button to open the Tally ERP 9 output in Excel

Tally to Excel

The Tally to Excel feature enables you to export data from Tally ERP 9 to MS-Excel. Though, Tally ERP 9 has inbuilt support to export data into MS-Excel format, this functionality is primarily restricted to export of Tally Reports and NOT raw data or selective raw-data. Contrary to this, udiMagic Free Edition allows you to retrieve selective raw-data using SQL-SELECT statements.

Download the udiMagic Free Edition

Error

Proper Pay link name not given

Error Message : Proper Pay link Name not given
Applies to       : Tally ERP 9 Release 4.8 or higher

Solution
To resolve the aforesaid error, you must add the following two tags within the BANKALLOCATIONS tag :

<PAYMENTMODE>Transacted</PAYMENTMODE>
<NAME>a-unique-alpha-numeric-value</NAME>

The complete BANKALLOCATIONS XML tag will look like this :-

<BANKALLOCATIONS.LIST>
    <DATE>20140401</DATE>
    <INSTRUMENTDATE>20140401</INSTRUMENTDATE>
    <TRANSACTIONTYPE>Cheque/DD</TRANSACTIONTYPE>
    <PAYMENTFAVOURING>Jewel Tree R.D. A/c</PAYMENTFAVOURING>
    <STATUS>No</STATUS>
    <AMOUNT>1000</AMOUNT>
    <!-- The two tags you must add to resolve Proper Paylink name not given error -->
    <PAYMENTMODE>Transacted</PAYMENTMODE>
    <NAME>A-101-20140401</NAME>
</BANKALLOCATIONS.LIST>
Uncategorized

Could not connect to Tally

PROBLEM/SYMPTON
1) Error: Could not not connect to Tally  (Even though Tally is running)
2) Error: No Company is Open in Tally    (Even though Tally is running and a Company is Open)
.
RESOLUTION

STEP 1 – CHANGE THE PORT NUMBER IN TALLY

From the Gateway of Tally, use the option “F12 >> Advanced Configuration” to change the Port Number.

Remarks :-
a) The default Port Number is 9000.
b) You can change it to 9001 or 9002 or 9003 or so on.
c) The Tally Software must be restarted for the effect to take place.
d) The new Port Number must appear in the “Gateway of Tally” srceen. Refer the screen snapshot which shows the default Tally Port Number 9000. In your case, it should show the Port Number as 9001 or 9002 or whatever you have set it to.
e) If the Port Number still does not appear in Tally, try changing the Port Number to a different one say (10001 or 10002 or 10003 so on). If still you do not get the Port Number in the Gateway of Tally screen, please contact Tally Solutions, Bangalore or the Vendor from whom you purchased Tally Software.

STEP 2 – CHANGE THE PORT NUMBER IN UDIMAGIC

You must set the same Port Number (which you have set in Tally) in UDIMagic Software.

1) Go to “My Computer >> C drive”
2) Go to the “UDI-Magic” folder. (i.e. c:\udi-magic folder)
3) Locate and Open the file “UDI-MAGIC.INI” (Configuration file) in Notepad.
4) Search (and add if not found) for the section [Tally] and add the ServerPort option. Your “udi-magic.ini” file will look as follows :-

[Tally]
ServerPort=9001

Remarks:-
Specify the ServerPort value as required. i.e. if you have set the Port in Tally to 9001, then the same Port Number is to be specified in UDI-Magic.ini file.

5) Save the “udi-magic.ini” file
6) Start UDIMagic software. It should now connect to Tally

If you want to confirm, you can send us the following files by email for verification

a) “Tally.ini”
b) “udi-magic.ini”
tally.erp

Alternate Units in Price List – Tally

There was a problem while using alternate units in Price List (upto Tally ERP 9 Release 3.2)

We had sent a query on this subject matter to Tally Solutions, Bangalore on 22nd March, 2011, which is given underneath for your reference :-

  • I have created a Price Level named “Cash Price”. Next, I entered the rate for Price Level “Cash Price”  for Item “ABC” for 1-3-2011. This works fine. Next, I entered rate for “Cash Price” for Item “XYZ” which has alternate units. The “XYZ” details are as follows:-
    Base Units : Nos
    Alternate Units : Box (where 1 Box = 10 Nos)

    In the Price Level, I entered the rate for “Cash Price” level for Item “XYZ” as 800/Box. The entry is accepted. However, when we again view it from “Gateway of Tally >> Inventory Info >> Price Level”, the Price level rate is not shown for Item “XYZ”. Next, I exported the data using “Display >> List of Accounts >> StockItems” and found that the Rate is exported correctly in XML format i.e. 800/Box.

    In Brief
    Price Level rates when entered for Alternate Units (say 800/Box – where Box is alternate unit), the same is not displayed in “Gateway of Tally >> Inventory Info >> Price List”

Update

The aforesaid issue has now been resolved in Tally ERP 9 Release 3.3 (as intimated to us by Tally Solutions, Bangalore)

tally.erp

Merge two Ledgers in Tally.ERP 9

How to merge two Ledgers in Tally.ERP ?

Merging two Ledgers in Tally.ERP 9

It is assumed that you have two Ledgers viz “Ledger 1” and “Ledger 2” and you need to merge the “Ledger 2” into “Ledger 1” such that all the Vouchers having “Ledger 2” would show “Ledger 1” after the merge-process.

PS:
a) Take backup of your Tally data for safety purpose before trying out the underneath steps.
b) We have tested Merging of two Ledgers with Tally.ERP 9 Release 3.0 only

Step-by-step instructions:-

  1. Change Tally.ERP 9 configuration settings
    a) Select option “Gateway of Tally >> F12 >> General”
    b) Set the option “Overwrite Vouchers during Import” to Yes
  2. Set the period in Tally.ERP 9
    Select option “Gateway of Tally >> Alt+F2” and set the period. Example if you have vouchers for three years, set the period accordingly so that the whole data is accessible.
  3. Export Tally.ERP 9 data in XML
    a) Select option “Gateway of Tally >> Display >> Daybook >> Alt+F2” and set the full-period
    b) Next, export Tally.ERP 9 data using “Alt+E” in XML format.
  4. Make changes in XML data
    a) Open the file “Daybook.xml” in Notepad and find/replace all occurrences of the “Ledger 2” with “Ledger 1”.
    Remarks: The file daybook.xml is created in step-3 on exporting data using Alt+E
    b) Save the Daybook.xml file
  5. Import data in Tally.ERP 9
    a) Select option “Gateway of Tally >> Import of Data >> Vouchers”.
    b) Specify the file-name (ex: daybook.xml) and press enter to import it.
  6. Verify the Vouchers in Tally.ERP 9
    Select option “Gateway of Tally >> Display >> Daybook” and check vouchers to verify the merging-process.
tally.erp

Purchase Invoice with Cost Centre and Cost Category

Recently on of our Clients raised the following issue :-

While entering Purchase entry with stockitems (in Invoice mode) in Tally ERP 9, we are unable to select / specify the Cost Category and Cost Centre as it can be done in Sales entry with stockitems (in Invoice mode).

On analysis, we found that in Purchase entry with stockitems (in Invoice mode), the Cost Category and Cost Centre allocation dialog box does NOT appear. However, it appears in (Voucher mode).

Prima facie this appears to be an issue with Tally Software. The Cost Category / Cost Centre dailog box should appear in Purchase entry with stockitems as it works in Sales entry with stockitems.


tally.erp

Tally ERP 9 – Client without ODBC

Unable to connect to Tally ERP 9

In the last few days, several of our clients have reported the problem that they are unable to connect to Tally ERP 9 using UDIMagic.

On further analysis, we noticed the following :-

1) The Configuration box in the Gateway of Tally shows “Client without ODBC
2) On using the option “Gateway of Tally >> F12 >> Advanced Configuration”, the options viz “Tally is acting as” and “Enable ODBC Server” are disabled.

To resolve the aforesaid issue, follow the underneath steps :-

  1. Start Tally ERP 9
  2. Press Ctrl + K to invoke Control Centre feature
  3. Enter your Tally.NET user id and password
  4. Select the option “Licensing & configuration
  5. Select the option  “License Management
  6. Press F9 to select option “Gen Config List
  7. Next, specify the values for the options as shown underneath :-
    a) Tally is acting as   = Server
    b) Enable ODBC Server = Yes
    Port = 9000
    Can be overridden locally = Yes
  8. Press Ctrl+A to save it.
  9. Next, select “Gateway  of Tally >> F12 >> Licensing >> Update License”
  10. Next, restart Tally ERP 9.

After following the aforesaid steps, the Configuration Box in Gateway of Tally must display Server with ODBC on Port 9000

In case, if the problem still remains, kindly report the issue to Tally Solutions, Bangalore with your Tally Serial Number.

Remarks:-
The aforesaid issue has been brought to our notice by our Customers within India and outside India.
It appears that some changes have been done by Tally Solutions, Bangalore relating to “Control Centre” default settings at their end which has caused this issue.